VisionGauge’s® Enhanced CAD Auto-Align™ Tool Receives A New US Patent

VisionGauge®’s patented enhanced CAD Auto-Align™ tool carries out high-accuracy CAD-to-Part alignment across multiple high-resolution images of a larger part
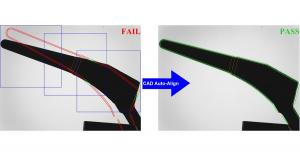
VisionGauge®’s CAD Auto-Align™ tool automatically aligns a CAD overlay to a part, allowing VisionGauge® to carry out fully-automated CAD-to-part comparison.
VisionGauge®’s groundbreaking CAD Auto-Align™ tool automatically aligns a CAD overlay to a part. This gives VisionGauge® its unique ability to carry out fully-automated CAD-to-part comparison.
VisionGauge®’s patented CAD Auto-Align™ tool allows you to drastically reduce inspection times and obtain increased accuracy. This powerful tool is very fast (it typically takes just a few seconds) and it produces repeatable and accurate results that are completely operator-independent! It’s a very general-purpose tool and the CAD-to-part alignment can be carried out along either a single or multiple datums or as an overall best-fit. The tool can carry out both translation and / or rotation alignment. You can easily apply it to meet the requirements of your specific application!
VisionGauge®’s CAD Auto-Align™ tool is used to solve many different applications across a very wide range of industries including medical, aviation & aerospace, power & energy, military & defense, tooling, packaging, electronics & semiconductors and many, many more. This tool is the ideal solution whenever a user needs to compare a part to its CAD data.
And the enhancement covered by this new patent makes VisionGauge®’s CAD Auto-Align™ tool even more widely applicable. It can now be applied to very large parts that extend way beyond the system’s optical field-of-view. It can also be used on parts that have very large variations in depth and height, much larger than the system’s optical depth-of-field.
When dealing with large parts, the system scans the part (a single time) and captures and stores images of all of the areas of interest as well as the precise location at which each image is taken (using the system’s high-accuracy encoder readings). VisionGauge®’s proprietary algorithm then iteratively aligns the CAD to the part, across all of the images and along all of the prescribed datums. As these calculations quickly converge to the correct solution, the system does not need to revisit any of the image capture locations, thus drastically speeding up the overall operation. All of the calculations throughout the entire process are carried out on the initial image buffers. This results in tremendous time savings and very fast overall performance, even when dealing with very large parts.
Furthermore, because there is no limit on the number of images used to encompass all of the part’s datums and features of interest, it is possible to carry out this CAD Auto-Align™ operation at high magnification, which produces very high accuracy results, even in the case of large parts.
And in the same way that VisionGauge®’s enhanced CAD Auto-Align™ tool is able to deal with parts that are larger than the system’s (XY) field-of-view, it can also overcome depth-of-field limitations. Specifically: in applications where the variations of the part’s height or depth (i.e. along the Z axis) are greater that the system’s optical depth-of-field, images taken at different Z positions can be included in the image set. VisionGauge®’s new calculation algorithm is then able to carry out a CAD Auto-Align™ over the image entire set, taken at different Z (and also possibly X and/ or Y) positions and best-fit the CAD to the part in these situations as well.
All of these recent enhancements are the subject of new patent applications.
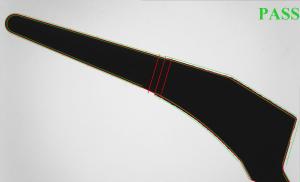
As previously, the results of VisionGauge®’s CAD Auto-Align™ operation can then be analyzed by VisionGauge®’s patented CAD Auto-Pass/Fail™ tool, all of which provide VisionGauge® with its unique and powerful ability for fully-automated high-accuracy part-to-CAD comparison.
VisionGauge®’s CAD Auto-Align™ tool:
• Fast
• Accurate & repeatable
• No limit on part size
• Results are completely operator-independent
• Unique advanced technology that is extremely easy-to-use
With VisionGauge®’s patented CAD Auto-Align™, CAD Auto Pass/Fail™ tools, VisionGauge® is truly revolutionizing how parts are inspected, quickly and accurately, directly on the shop floor!
To learn more about the benefits of the VisionGauge® Digital Optical Comparator, or for a demonstration on your part, please contact VISIONx, Inc., either by visiting the web site at www.visionxinc.com or by emailing info@visionxinc.com.
VISIONx INC. specializes in automated imaging, visual inspection and high accuracy measurement solutions sold worldwide and is the manufacturer of the VisionGauge® Digital Optical Comparator.
Patrick Beauchemin
VISIONx, Inc.
+1 514-694-9290
email us here
Visit us on social media:
LinkedIn
Facebook
YouTube
X
VisionGauge® Digital Optical Comparator patented CAD Auto-Align™ and CAD Auto Pass/Fail™ tools
Legal Disclaimer:
EIN Presswire provides this news content "as is" without warranty of any kind. We do not accept any responsibility or liability for the accuracy, content, images, videos, licenses, completeness, legality, or reliability of the information contained in this article. If you have any complaints or copyright issues related to this article, kindly contact the author above.


